Author: Jake Murray

Cabinet Refinishing – Give Your Cabinets a Fresh Look

Cabinet Refinishing Sacramento is a cost-effective way to freshen your cabinets. It’s ideal for cabinetry that doesn’t have major damage or wear.

Cabinet Refinishing

Refinishing involves a thorough cleaning, sanding, and painting. The process also involves repairing imperfections and caulking.

Cabinet refinishing is an effective solution for hiding minor wear and tear and giving your kitchen a fresh new look. Refinishing involves removing the existing finish from your cabinets, either by chemically stripping or hand-sanding, then applying a new stain or paint. This type of surface-only refurbishment will not change the overall design or functionality of your cabinets and can usually be completed in just one day.

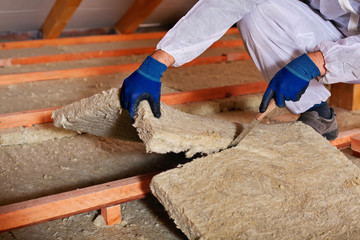
Regardless of which type of cabinet refinishing you choose, the proper preparation process is essential to ensure smooth and lasting results. Without adequate preparation, your new finish may chip or fade within a matter of months. This is why it’s so important to work with a professional who understands the importance of thorough prep and has the experience and equipment necessary to complete the job.

Start by removing all cabinet knobs, handles, and hinges. This will make it easier to reinstall them later. Be sure to mark and label each hardware piece so it’s easy to find when you’re ready to put everything back together. Next, clean your cabinets using a degreaser or a mixture of vinegar and water to remove grease and grime. Pay special attention to areas around stoves and handle as they tend to accumulate the most grease and oil residue.

Once your cabinets are dry, sand them with a fine-grit sandpaper to provide a smooth, even surface. Be sure to sand in the direction of the wood grain for best results. If there are any imperfections in the wood, such as dents or scratches, fill them with a wood filler and let them dry completely before sanding again.

Finally, apply a primer to the surfaces that will be painted. This will help to prevent stains from showing through the finish and will improve adhesion. Be sure to follow the manufacturer’s instructions for application and drying times. Once the primer is dry, sand again with a fine-grit sandpaper and wipe down your cabinets to clean them of dust and debris.

Now that your cabinets are prepared, it’s time to begin the painting process! Be sure to choose a high-quality, durable product that is appropriate for your cabinet material.

Primer

A cabinet primer is like the glue layer that connects your paint to your cabinets. It preps the surface to accept the top coat and allows it to adhere well, no matter what type of material the cabinets are made from – wood or manufactured composites. Primer also helps hide minor imperfections and odors and some are very good at stain-blocking (especially important when painting over tannin-rich or oil-based surfaces).

There are several different types of primer available, each with a specific set of pros and cons. Depending on your needs, you can choose from oil-based, water-based, shellac-based and hybrid. Each has its own unique amount of volatile organic compounds (VOCs), and varying degrees of odor and stain-blocking properties.

It’s important to follow the specific instructions and recommendations on your chosen primer. These are specifically designed to maximize your results and ensure the best possible outcome for your refinishing project. For example, a quality product like KILZ 3 Premium Primer offers excellent adhesion and stain-blocking for all wood materials, including previously painted surfaces. This primer can be used with both oil-based and latex paints, as well as a variety of finishes, and it’s easy to work with and dries quickly.

Other common mistakes that can be made include neglecting thorough cleaning and degreasing, resulting in a less-than-ideal surface for primer to adhere to. Another is not allowing adequate ventilation, especially when using primers that produce strong odors or require special solvents to clean up. Finally, not allowing enough time between coats of primer and paint. This is crucial, particularly with enamel, as it takes weeks for the paint to cure and harden fully.

In addition to removing handles and hardware, it’s a good idea to mask off the areas surrounding your cabinets with painter’s tape and use drop cloths or sheets to protect your workspace and furniture. This will help you maintain a better focus and avoid accidentally getting paint on anything you don’t want to. It’s also a good idea to repair any holes, dents and cracks prior to priming, as they’re much easier to fix at this point than once you start painting.

Paint

Cabinet painting is an easy DIY-friendly way to give your cabinets a facelift. You can also use a fresh coat of paint to correct color problems and hide scratches or wear and tear. However, the new paint job will only last if you choose high-quality products and follow the proper application techniques. Kitchen environments are filled with grease, moisture and other substances that can be extremely detrimental to most paint jobs.

Choosing the right primer is an important step in your cabinet refinishing process, as it helps ensure that your topcoat will adhere well. Most high-quality primers are designed to bond strongly both mechanically and chemically to the surface for a better finish and greater durability. Some are also formulated to prevent bleed-through of the original stain or paint. If you’re using a latex primer, consider opting for one with low-odor properties so that you can continue to live in your home while the cabinets are being refinished.

After applying the primer, you can begin painting the cabinets, either with a brush and roller or a paint sprayer (diy-friendly). For maximum durability, two coats of quality oil-based lacquer are recommended, but if you’re in a hurry and don’t want to wait, a good water-based enamel will also provide a good protective layer.

When applying your first coat of paint, be sure to apply it evenly and let it dry for several hours. After that, you can lightly sand and then apply another coat. Again, be patient and allow the second coat to fully dry before sanding again.

You can also choose to sand the doors after the third coat of paint, but you’ll have to carefully mask off the hardware holes before doing so. If you do this, make sure to use a fine-grit sandpaper and wipe down any sanding dust with a damp cloth before proceeding.

If you choose to refinish the doors yourself, be sure to purchase a paint that is formulated for high-use areas. Many companies offer extreme bond paints that are designed to hold up to frequent contact with fingers and hands, as well as moisture and grease.

Finish

As long as your cabinets don’t have any gashes or water damage, refinishing can add many more years of life to them. However, it’s important to note that refinishing will not protect your cabinetry from the abuse of a busy kitchen. Even with the best of care, your cabinets will eventually chip and wear down. You can help prolong the lifespan of your cabinets by having a professional clear coat apply a protective layer to your finish.

This process is very time consuming and requires the use of a chemical stripper, which will create some fumes. If you have children or pets, this may not be the ideal option for your home. It’s also important to understand that this is only a cosmetic improvement, it will not fix any problems like warped doors or faulty hardware.

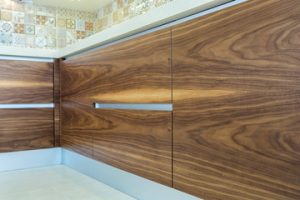
Staining your cabinets is a great way to bring out the natural wood grain and can give your kitchen a more modern look. It is also more cost efficient than refacing your cabinets, especially if your cabinets are in good shape. However, it’s important to remember that staining can make your cabinets more vulnerable to scratches and chips. If you’re looking for a more durable finish, a varnish is a better choice. This type of clear coating can be applied in a matte or glossy finish.

A clear coat protects your cabinets from moisture and heat and helps keep them looking new. This is a very durable coating that can last for years, but it’s important to properly prepare your cabinets before applying the clear coat. This includes cleaning, sanding and priming your cabinets. It’s also a good idea to label your cabinet doors, so you don’t end up repainting them in the wrong places.

When you’re ready to apply your clear coat, it is recommended to start by using a small brush and “tipping” the surface. This is when you lightly pass the brush over the wet finish, following the direction of the grain. This will help to reduce brush strokes and achieve a smooth, even finish. Be sure to wait at least 3-4 hours for your coat to dry before you can continue with the rest of the refinishing process.

Preventing Health Hazards: The Importance of Professional Insulation Removal

Old insulation can cause draftiness and high energy bills. Moreover, it can become a cozy nesting ground for pests in your attic. Old insulation can also become contaminated with mold or mildew. This can result in dangerous respiratory issues and damage your home’s structure. Insulation Removal Perth can help prevent such problems by removing contaminated insulation materials.

Preparation

Insulation

Insulation is a vital home improvement that enhances comfort, saves energy costs and positively impacts indoor air quality. However, there are times when new insulation needs to be replaced or removed due to age, damage, rodents, and other factors.

When this occurs, a thorough assessment should be conducted to identify the type and condition of the insulation. This will help determine whether it should be removed and facilitate replacement.

The preparation phase of insulation removal involves the proper staging and securing of equipment and supplies. This includes a dumpster for waste disposal and, in some cases, specialized equipment for spray foam removal. The preparation phase also encompasses a thorough inspection of the attic space, which is necessary to identify any potential problems that may be encountered during the insulation removal and disposal process. This is particularly important because it is possible that hazardous materials like asbestos or fiberglass could be found in some older types of insulation.

Once the necessary steps have been taken to prepare for the insulation removal and disposal process, it is time to start removing the old insulation. This process should be completed with the utmost care and attention to detail. For this reason, it is generally a good idea to hire a professional to handle the task. This will help to ensure that the job is done correctly and that any potentially dangerous materials are properly handled in accordance with state and local regulations.

In addition, the removal of old insulation will often reveal problems that would otherwise go unnoticed. For example, if the old insulation has become damp, it can promote the growth of mold and mildew, which can lead to health problems when inhaled. Also, the presence of rodent urine and feces can cause a musty smell throughout the house.

Finally, deteriorating insulation can lead to moisture problems that may result in rot and structural damage. Performing proper insulation removal and replacement will eliminate these conditions and prevent costly problems down the road. In addition, it will help ensure that the new insulation is able to perform its intended function.

Removal

Insulation is a vital component of keeping your home safe, comfortable, and energy efficient. However, it’s not indestructible, and over time, damage and disrepair can occur. When this happens, it’s important to address the issue promptly. This is because damaged insulation can trap moisture that leads to mold, mildew, and other structural issues. It can also lead to poor indoor air quality and increased health risks. Therefore, removing old insulation is a critical part of maintaining a healthy home.

The process of removing insulation can be a complex one. There are many factors to consider, including the type of insulation and its condition. If the insulation is saturated with moisture or infested with rodents, for instance, it might be necessary to conduct a full teardown and dispose of the affected materials. This is a labor-intensive project that requires the removal of drywall, and it’s usually best left to professionals who can handle the entire process from start to finish.

If the insulation is in good shape, the process is relatively simple. The first step is to clear the attic space of any items and ensure a clear path from the attic access door to the floor below. Next, a specialized vacuum is used to remove the insulation. The insulation will be deposited in large bags and disposed of appropriately.

For blown in cellulose or fiberglass insulation, the process is slightly more complicated. A professional will use a special vacuum system to remove the material without letting any particles escape from the attic space or enter other parts of the home. They will also make sure that the attic vents are open and that there is sufficient airflow to prevent clogging.

Blown in cellulose and fiberglass insulation can contain asbestos, which is hazardous when disturbed. As such, it’s important to hire professionals who are certified in handling these materials. This can minimize health risks for homeowners and their families.

Disposal

Insulation is an important part of a home and can help regulate the temperature and increase energy efficiency. Over time, however, insulation can lose its effectiveness and require removal and replacement. In addition, contaminated insulation can lead to mold, mildew, and other contaminants that may pose health risks.

For this reason, proper insulation removal is an important part of a comprehensive home improvement project. This process involves removing old, contaminated, or damaged insulation from walls, attics, and other areas of the house, and then disposing of it. This allows new insulation to be installed, resulting in improved comfort and lower energy bills.

The removal phase of the insulation process is a complex task that requires a variety of tools, equipment, and skills to be done safely and effectively. Prior to starting, it is important to make sure that all equipment is set up in a safe location. This includes setting up the commercial vacuum, and making sure that the hose is connected to the attic access. It is also a good idea to put on personal protective gear, and clear away any debris in the attic that might be a tripping risk or could damage the ductwork during the removal process.

Once the attic space has been cleared, it is time to start the insulation removal process. Depending on the type of insulation, this can be relatively easy or quite complicated. Fiberglass batts and rolls, and cellulose and rockwool are the easiest types to remove by hand, as they can be rolled up and placed into waste bags for disposal. Other types of insulation, such as blown in foam insulation and loose fill fiberglass insulation can be more difficult to remove by hand, but can be sucked up by a professional using a special vacuum.

In some cases, contaminated insulation can have a severe impact on the health and safety of the family living in the home. If it is moldy, for example, it can release spores into the air that can cause a wide range of negative symptoms, from itchy eyes and skin to asthma. Insulation that has been contaminated by rodent urine or feces can also be dangerous, as it can create a nesting site for pests that will chew through drywall and damage the structure of the home.

Cleanup

Insulation is an important part of a home and can make the difference between a comfortable home and one that is uncomfortable. Replacing old or damaged insulation is an effective way to improve the comfort of a home and can increase its value as well.

However, replacing attic insulation can be a tricky process that involves the careful removal and cleanup of existing material before installing new. This process can be difficult for homeowners and is best handled by professionals who are familiar with this task.

During the cleanup phase of insulation removal, professionals can ensure that all materials are removed from the attic and disposed of properly. They can also help prevent any potential damage to attic systems or electrical wiring. This can be especially beneficial if the attic space has been compromised by rodents and their fecal droppings. These contaminants can spread throughout the house and can cause health problems for those living in the home.

Once the contaminated material is removed and the attic is clean, professionals can install new insulation to create a comfortable home environment for families. In addition, new insulation will also improve the energy efficiency of a home and lower energy bills.

When insulating an attic, it is important to consider the size of the room and the type of insulation needed. Using too much or too little can impact how well a home is insulated. It is important to consult with a professional insulation company that can determine the right amount of insulation needed for a particular attic.

Attempting to remove attic insulation on your own can be hazardous to your health and cause structural damage to your home. Disturbing the insulation can stir up dust, mold, animal waste and other pollutants that can harm your health and cause allergic reactions in your family members. Depending on the type of insulation used in your house, disturbing the material can also expose you to dangerous substances like asbestos.

Lastly, attempting to remove attic insulation without the proper tools or experience can lead to injuries and property damage. This can include cutting or tearing into wires in the attic and creating dangerous electrical hazards. It is important to disconnect any power sources before working with insulation.

Becoming an Electrician

If you’re looking for a career that offers security and stability, becoming an electrician may be right for you. Many communities need qualified electricians, and it’s a skill that will likely always be in demand.

Electrician

Start with classroom training at a trade school or community college. Look for programs that offer scholarships for apprentices. These can help offset the cost of schooling and tools.

Electricians install and repair electrical power, communications, lighting, and control networks in homes, businesses, factories, public spaces, and thoroughfares. They also ensure that all electrical work is up to code and follows established safety standards. These professionals often work on high voltage systems, which can be dangerous if they are not properly maintained. Those who wish to pursue careers in this field should consider apprenticeships or trade schools. These programs provide hands-on experience and the skills necessary to become a licensed journeyman electrician.

Electricians must be comfortable working with a wide range of tools, including hand and power tools. They also need to be able to read blueprints and diagrams. Some of their duties include measuring, bending conduit, and performing inspections to check for proper wiring and connections. Additionally, they may have to climb ladders or scaffolding to complete their work. Some electricians work for large companies while others are self-employed.

A career as an electrician can be very rewarding, but it can be difficult to break into. Most electricians start out in an apprenticeship program, which can take 4-5 years to complete. Apprenticeships offer on-the-job training and paid schooling. After completing an apprenticeship, most states require journeymen to obtain a license. In addition, electricians must be comfortable working with chemicals, solvents, and cleaners, which can be hazardous if not properly used.

Electricians must have good hand-eye coordination and be able to work well under pressure. They also must be comfortable working in cramped conditions and dealing with dirt, dust, or fumes. Additionally, they must be willing to learn and adapt to new technology. Some electricians specialize in certain fields, such as commercial or industrial, while others focus on residential projects.

A journeyman electrician can also work as a supervisor or project manager, depending on the industry in which they are employed. They can also set up their own business or become a trainer for others interested in becoming an electrician.

Education requirements

A successful career as an electrician requires a combination of education, training and skills. You can gain the necessary knowledge through a formal training program, such as an apprenticeship or a vocational school. In addition to learning the technical aspects of the job, you should also have a good understanding of state and local regulations. You must also be able to read blueprints and understand electrical codes. A good grasp of math, physics and geometry is also important.

There are several ways to become an electrician, but you should choose a program that matches your interests and goals. If you want to work on residential projects, for example, consider a trade school that offers a certificate or associate’s degree in electrical technology. You can also enroll in an apprenticeship program, which typically lasts four years and includes 8,000 hours of on-the-job training. After you complete your apprenticeship, you can obtain a license to work as a journeyman electrician.

If you don’t have the time to complete a full apprenticeship, you can still become a qualified electrician by taking a college course and completing an NVQ Level 3 in Building Services Engineering for Construction or an equivalent qualification from the EAL. You should also have normal color vision and be able to pass an eye test to qualify for work on a construction site. You can also get relevant experience by working weekends and holidays for a relative who is an electrician.

In addition to these qualifications, you should have good manual dexterity and the ability to follow instructions. Electricians often work in confined spaces, and they must be able to lift heavy materials. They must also be able to work in dirty and noisy environments. Depending on your specialization, you may need to climb ladders or scaffolding. You should also be able to communicate effectively with other skilled trade professionals and designers. If you are unable to communicate clearly, mistakes could be made that put people in danger. This is why it is important to have strong verbal and written communication skills.

Job outlook

The job outlook for electricians is good. They are in demand due to the continuing need to maintain and upgrade existing electrical systems in homes and businesses, as well as to repair power outages caused by storms or grid problems. In addition, the growth of green energy technologies requires electricians to install and repair equipment that harnesses wind and solar power. Electricians can also expect to continue to earn above-average wages.

Many people choose to pursue careers in the skilled trades. They provide excellent career opportunities and salaries, while still allowing for the pursuit of personal interests. Skilled trades are not only in high demand, but they are a safe choice for those looking to avoid risky occupations such as the military or law enforcement.

In the US, employment for electricians is projected to increase by about nine percent between 2020 and 2030. This is higher than the average across all occupations, and suggests that there are plenty of jobs available for qualified individuals. This is great news for those considering a new career.

However, the supply of electricians is currently a little low. This is a result of both the normal retirement cycle and the COVID-19 pandemic, which accelerated the retirement timeline for Baby Boomers in all industries. In addition, some experienced electricians have left the industry altogether and gone into other types of work.

Electricians need to be able to read blueprints, which include technical diagrams of electrical systems that show the location of circuits and outlets. They also use a variety of hand and power tools, including conduit benders, screwdrivers, wire strippers, and drills. They also troubleshoot problems and test for faults using ammeters, voltmeters, thermal scanners, and cable testers.

Electricians must have physical stamina because they are often on their feet all day running wire and connecting fixtures. They must also be strong enough to lift and move heavy components, which can sometimes weigh up to 50 pounds. They also need to be able to think critically and solve problems. For example, if an electric motor fails, they must run tests to find out the source of the problem and determine whether it can be fixed or if the machine needs to be replaced.

Salary

An electrician’s salary can vary depending on their specialty. For example, an electrician who works in a power plant will earn more than one who works on residential systems. However, the average electrician’s salary is around $65,000. Those who work in substations earn even more. Some electricians choose to specialize in renewable energy, which pays well because demand for this type of electricity is increasing rapidly.

Electricians are in high demand, especially since many buildings need maintenance on electrical circuitry and connect to power grids. In addition, aging infrastructure requires upgrading. The Bureau of Labor Statistics projects about 84,700 jobs for electricians over the next decade. However, these numbers are likely to be affected by government policies regarding alternative power sources such as wind and solar.

The average electrician’s salary varies by state and region, but is usually higher in urban areas than in rural ones. The cost of living also impacts wages. Generally, electricians with more experience and seniority are paid more than those who are just starting out. An apprentice will typically only make half of what a licensed electrician earns, but they will increase their salary as they complete each phase of their apprenticeship.

Some electricians choose to join a union, which can help them negotiate higher salaries and benefits. These include health insurance and retirement plans. However, joining a union can take time and effort, and it may not be the right choice for everyone. Some electricians are also self-employed. While this can offer more flexibility, it can lead to inconsistent income.

While it may be tempting to delay your apprenticeship so that you can start earning more money, it’s best to follow your dreams and do what you want to do. The more you learn, the better you will be at your job. If you can do something that no one else in your company does, you’ll be a great asset to the business.

In the United States, there are two primary categories of electricians: linepersons, who work on electric utility systems at higher voltage levels, and wiremen, who specialize in the lower voltages used inside buildings. Both types can find employment in both the public and private sectors. Those with more technical skills can also specialize in areas such as control wiring and fire-alarm systems.

Navigation