Boston Roofing Co is the construction or replacement of the outermost covering of a building. Roofing materials protect the structure from rain, snow, and sun damage.
Roofing installations vary from re-roofing homes to constructing roofs for barns, sheds, and other outbuildings. The installation process can be complicated by working around obstacles like chimneys and valleys.
Choosing the right roofing materials is one of the most critical decisions you will make during your roof replacement. The material you choose will impact the cost, durability, aesthetics and climate of your home. Asphalt shingles are a popular choice due to their affordability and ease of installation, while metal offers superior durability and energy efficiency. For a natural, rustic aesthetic, wood shingles are a beautiful option. However, they require regular maintenance and are prone to fire damage.
Once the underlying structure is in place, you can begin installing the new roof. Begin by tearing off any old shingles and preparing the area for the new roofing materials. If necessary, rent a dumpster to make clean-up easier. Cover any movable objects close to the house with large tarps to protect them from falling debris. Install any new vents or skylights at this time as well. It’s also a good idea to lay the self-stick waterproof underlayment, which is often required by code in regions with extreme weather.
If you are going to do the installation yourself, it’s essential to have the proper tools for the job. A roofing nail gun is a great tool for speeding up the process and making it safer. It’s also a good idea invest in some high-quality roofing nails as well as a roofing knife for cutting shingles to size.
A professional roofing contractor will be able to recommend the best roofing materials for your home. They will take into consideration the architecture and style of your home, as well as your desired aesthetic. They will also provide information about the different features available for your roof, such as energy efficiency, solar panels and water-resistant materials.
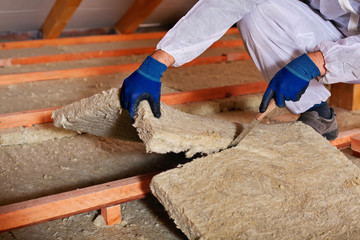
Load Transfer: The roof transfers wind and snow loads to the walls and foundation of the building, so it must be built to withstand these forces. The design of the trusses, rafters and sheathing is crucial to maintain the integrity of the building. Insulation: Increasing the amount of insulation in your home will improve its energy efficiency and help save you money on heating and cooling costs. Insulation is available in a wide variety of forms, including foam, cotton and wool. Flashing: Specialty shingles, flashing and underlayment are installed to prevent leaks around the edges of your roof.
Preparation
Whether you’re re-roofing your home or installing a new roof, there are many preparatory steps that should be taken. The first is to clear the work area and set up safety measures. This includes covering plants and setting up scaffolding if needed. It also involves removing the old roofing materials and disposing of them responsibly. This step allows for a clean slate and helps ensure that the new roofing will adhere properly.
During the preparation phase, your contractor will also inspect your roof to assess the underlying structure and make any necessary repairs. It’s important to catch any underlying issues as early as possible, so that they don’t escalate into costly problems down the road.
After the preparation stage is complete, your contractor will start the actual roofing installation process. They’ll begin by installing a metal drip edge along the roof’s perimeter to protect the edges from moisture and, depending on your climate, ice dams. Next, they’ll add a self-stick ice barrier underlayment to prevent water from melting snow and ice from seeping through the shingles. This is especially critical in areas with harsh winter weather.
Then, they’ll lay the first row of shingles, starting at one side and working their way across. They’ll carefully overlap the shingles and use cap nails to secure them to the roof decking.
Next, they’ll install valley flashing and ice and water sheathing to further protect your roof. These are essential for regions with harsh winter weather, as they prevent moisture from seeping into the roof’s interior. They’ll also add venting and ridge flashing to keep your attic cool and improve air circulation.
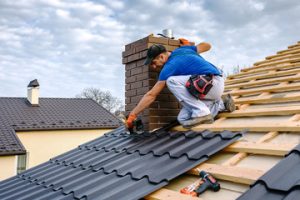
Finally, they’ll install metal flashing around chimneys, wood stove pipes, certain vents, and joints on the roof to prevent moisture from sneaking into these vulnerable spots. They’ll also apply a waterproofing sealant to the roof’s seams and joints, and any other areas that need it.
Before the roofing contractors leave your home, they’ll do a final inspection to ensure that all of the work has been completed to your satisfaction. This includes removing debris from the work area and blowing away leftover nail residue.
Installation
A professional roofing contractor will start by tearing off the old materials (if needed), inspecting and repairing the roof deck, installing underlayment, and applying the final roofing material. They’ll also install ventilation, flashing, and roof coating to ensure the longevity of the new roof.
After removing the old shingles and tar, the roofers will install underlayment over the entire roof deck to protect it from moisture damage. This will help prevent water leaks and extend the lifespan of the new roof.
They’ll then begin installing the new roofing panels, starting at one end of the roof and working their way across. Overlap the panels as instructed by the manufacturer to prevent water leaks. Be sure to work around any vents, skylights, and chimneys when necessary, and use metal snips or a saw with a metal-cutting blade for precise cuts.
Once the roofers have finished laying the panels, they’ll install a ridge cap to create a weathertight seal at the top of the roof. They’ll also secure the breathable ridge membrane to the ridge batten, and add a ridge-to-ridge seal to offer additional strength.
Once the job is done, a reputable roofing contractor will clean up the work area and dispose of all waste materials according to local regulations. They’ll blow away any leftover shingle debris and nails from the work zone, and inspect the property for missed debris that might pose a safety hazard. They’ll also leave you with documentation of the installation process, the materials used, and the manufacturer warranty to file if there are any issues in the future.
Maintenance
During this maintenance, the roofer will walk the roof and look for loose, curled, or missing shingles. They will also check the underlayment to make sure it is in good condition. They will also inspect the eaves and roof valleys for rust, staining, or moss growth. They will look at the flashing around chimneys, wood stove pipes, certain vents, and along hip roofs to ensure they are secure and in good condition.
They will also inspect the gutters to make sure they are free from debris, and that they are adequately anchored. They will also clean the roof deck of organic vegetation, and ensure that caulking at storm collars on tall cones, HSS posts and plumbing vent stacks is adequate.
Roofing inspections are important to catch any small problems before they become big ones that require expensive repairs or replacement. Leaks can damage building interiors, equipment, and inventory. These can be costly, and can often require the disruption of a business or home for extended periods of time. Regular inspections can identify and address issues quickly before they cause serious damage, and allow owners to claim their Actual Cash Value from insurance companies if necessary. A proactive approach to maintenance will prevent these costs and keep the building in good condition for years to come.